How to Add an HTML sitemap in Blogger? (2023)
An HTML sitemap is a visual sitemap that helps visitors to navigate your website easily. it is a standalone page that contains all of your post links on your website. It automatically updates the page once a new post is published on your website.
In this article, I will show you how you can add an HTML sitemap To your Blogger website.
So, you should know the difference between XML sitemap and HTML sitemap. An XML sitemap helps search engine to discover new pages of your website. Whenever search engine bots come to a site, they crawl the XML sitemap first and then visit all other pages.
That’s because the XML sitemap contains all of your post links and it is easy for search engine crawlers to crawl the site more efficiently. But, the problem with XML sitemap is that the readability is low.
It is very difficult to read this sitemap by normal visitors as it is written in XML code. So, to solve the problem, you can create an HTML sitemap on your Blogger website which will contain all of your post links in a well-formatted manner. So, users can easily jump to posts in different categories with a few clicks.
Steps to Add an HTML sitemap in Blogger
1) To Add the HTML sitemap in Blogger, log in to the dashboard and click on the pages section.
2) Now create a new page, and name it “HTML sitemap“
3) Now switch to the “HTML View” and you need to paste the given code.
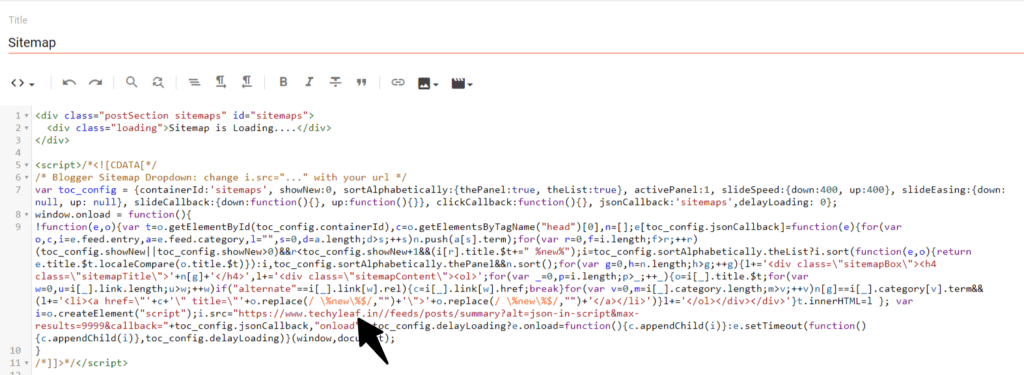
4) Now you need to change the example.com with your website link in the given format.
5) Now you can paste the given CSS code to make it look more attractive.
<style>
.sitemaps{font-size:14px}
.sitemapBox{padding:15px;border:0px solid black;border-radius:5px; box-shadow: rgba(60, 64, 67, 0.3) 0px 1px 2px 0px, rgba(60, 64, 67, 0.15) 0px 2px 6px 2px;}
.sitemapBox:not(:last-child){margin-bottom:20px}
.postEntry .sitemapTitle{margin-top:0; font-size:14px;font-weight:400;font-family:var(--body-font)}
.sitemapTitle:before{content:'Label: '; font-size:90%;opacity:.8}
.sitemaps ol{list-style:none;margin:0;padding:0;counter-reset:sitemap-count}
.sitemaps li{display:flex;align-items:baseline}
.sitemaps li:not(:last-child){margin-bottom:0}
.sitemaps li:before{content:counter(sitemap-count) '.';counter-increment:sitemap-count;flex-shrink:0;width:25px;font-size:13px;font-family:var(--font-body);line-height:normal; opacity:.7}

.darkMode .sitemapBox{border-color:rgba(255,255,255,.1)}
</style>
6) Now you can change the .darkmode class (According to your Theme) in the CSS code to make it work in dark mode.
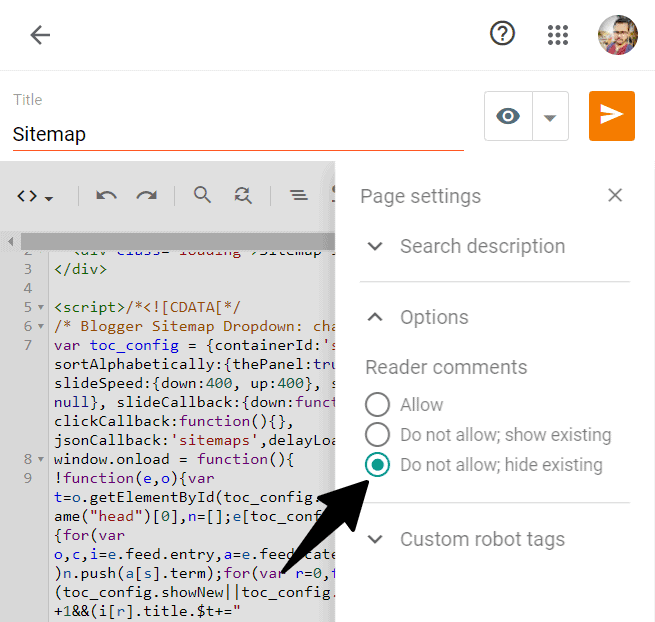
7) Now in the right sidebar, click on the post option and disallow the comments on that page.
8) Now Hit the Publish button and the HTML sitemap will be added to your Blogger website.
You can see the demo of the HTML sitemap below.
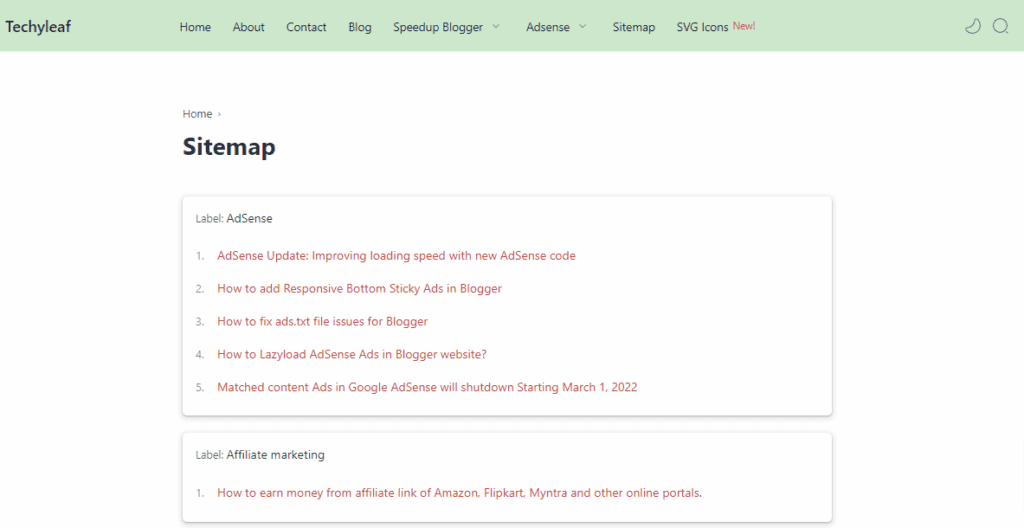
Now You have created the HTML sitemap page, I recommend you add this page link to your header navigation menu and footer menu. So, both Users and search engines can find your pages more easily.
This page will help you index your posts faster in Google and other search engines.
You can check some Alternative HTML sitemaps for Blogger here.
Conclusion
I hope you have successfully added the HTML sitemap to your Blogger website. If you have any doubts let us know in the comments section.
Read Also: 5 Best Ecommerce Blogger Templates for Online Store


